Saturday, December 31, 2016

True Love - Operation Smile

This was inspired by someone on one of the CTMH Consultant sites - and I've forgotten who!  I changed just a couple of things - top piece, white ribbon, and black/dot piece and the shirt on the boy - otherwise it was just like the card I saw.  If it was your design, please speak up!

I am really enjoying this Operation Smile stamp set!  It's so cute, and one of the sentiments ("This Card is a Paper Hug") really is what my hand-made cards are all about, after all!  Anyway - This one I can post before 1/1 without giving anything away, so enjoy!!

ps - used my birthday/Christmas gift flesh-tone pencils and markers on this one, too.  I am so glad to finally have a variety of flesh tones!
Friday, December 30, 2016

More Thanks

This card is an imitation of the one on the front of the new Seasonal Expressions Catalog that is available 1/1/17.  I used a thin cut sentiment from my stash (not CTMH) and cut it from one of the design papers, and rose gold foil tape from CTMH instead of the ribbon shown on the new catalog.  See me if you NEED a copy of the catalog!  Same paper pack - "Hello Lovely".  It seems to be designed for weddings - but I need thank you notes more than anything!  LOL

I learned an awesome trick making this card.  The design paper (in Whisper) on the card front is the reverse side of the pink scallop design of the circle.  Since I was adding a White Daisy cardstock piece between the two, there was no reason to waste all that paper under the white piece - so I cut my circle from there.  (I bet you all knew that!   I'm still trying to catch up here!)

Wednesday, December 28, 2016

New Seasonal Expressions sneaky peak

There isn't enough of the new "Hello Lovely" paper pack from the Seasonal Expressions 1 - 2017 launching 1/1/17 to qualify as a more than a sneaky peak, is there?  I didn't think so either!

The little lamb and sentiment are from Stamping Bella - I got them at least 6 years ago; I loved them at first sight and haven't used them very much.  My darling daughter gave me flesh tone pencils and dye-markers for Christmas/Birthday and I had to play immediately!  One of the first images I thought of was this sweet lamb!  Finally, a card with my sweet lamb!  Both doilies are from my stash, rose gold sequins from somewhere - not CTMH. The circle is cut with stitched circles from My Favorite Things.  Everything else is CTMH: Sorbet, Sea Glass, Fern, New England Ivy, Whisper, White Daisy, Colonial White, and Desert Sand.

Tuesday, December 27, 2016

Cats (real one)

I'm interrupting our regularly scheduled posts of cards for two very important reasons!  1st, I have made two things to share and am supposed to wait, wait, wait until the new year to post them.  I dislike rules!  2nd, I have the cutest kitty in the world and doesn't everyone want to see photos of him?  

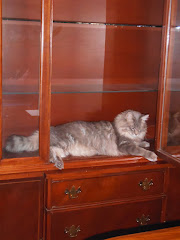
Presenting, Mr. Bilbo Baggins and his new toy!
This kitty weighs over 25 pounds.  He has been on a diet for three years - because he has to be 25 pounds or less to fly on the airplane.  His response to receiving smaller portions of food?  He is now sleeping 23 1/2 hours a day and play involves laying down and batting at the toy for a moment.  I love this guy!  Wish I could take him for a walk or something!

Sunday, December 25, 2016

Exploring in the Studio - Retired CTMH design papers!


This card was made with a retired paper pack, some smokey plum (dusty plum?) cardstock (also a retired color, I believe), and a small piece of vellum with a diagonal stripe.  The bouquet is a "sneaky peak" at a new stamp (shhhh!) and the ribbon is seam binding in a teal-ish color.  I added a beige dot pattern to the inside with a stripe of the design paper from the front.  I thought the vellum helped tone down the  busy-ness of the pattern paper.  It could be a sympathy, thinking of you, or even a valentine card?!

Hugs!  


Friday, December 23, 2016

Old and New

Last year I did a card workshop where we made the card on the right hand side "Twinkle Twinkle".  I thought it was really cute with possibilities for a baby card!  Today while fiddling around in the studio I found one left-over card packet with the elements and rather than let them go to waste, I decided to make the card!  Do you think I could find the SOTM set that had "twinkle twinkle"?  Nope.  (I did find it - just now as I was sitting down to write this post!) So, I improvised with the cute little "M" stamp that was recently available that had birthday wishes with a few tiny stars.  I added some more stars in from a set called All is Calm, All is bright, and I found a black star puffy to use instead of stamping the star.  The Glacier thick twine was also missing in action so I used black grosgrain (love it!).  The cards are "same" but "different".  Fun!

Well - great news is that I'm 10 days post-spinal fusion surgery and I've turned the corner!  All it took was more chemicals (ahem, drugs).  But seriously, I am truly doing great!  What an awesome Christmas gift!

Merry Christmas, or Happy Holidays, hope you are finding time to relax with loved ones.

Sunday, December 18, 2016

R&D from Nancy Ball

I was very inspired by Nancy Ball a few weeks ago when she created several different colors of cards using the Close to My Heart Lovely Leaves.  Check out her awesome work here. I think the only change I might have made to her stunning design was to use a sentiment from the December Stamp of The Month set.  Thank you Nancy for the idea!  *ps - I use the term "R&D" to mean "rip-off and duplicate"

Friday, December 16, 2016

Playing with Embossing Paste

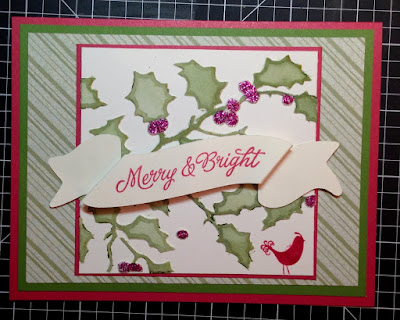
The technique we learned at the most recent Open Stamping involved Embossing Paste.  I was thrilled at how easy this technique is to use!  I had a Tim Holtz stencil of Holly & Berries on my desk and wondered what could be done to color embossing paste after it was dry?!  This example used a water brush and the Close to My Heart dye inks.  The berries were colored with Stickles (remember them?!).  I'm not sure it was worth all the effort - but it did turn out looking pretty cool.  Nice to know it does work!

I made this one before I went in for spinal surgery.  I'm home now but not allowed to sit for very long - so it may be a few more days before I get back into the studio!  All in all, I'm thrilled with the surgery results.

Thursday, December 15, 2016

Swan Lake paper pack - only available until Dec. 31st

The "mask" on this kitty's face reminded me of Robin Hood or "Cat Man" (giggle) so I decided to have the kitty with a little fishy friend. Still loving Swan Lake papers!

Tuesday, December 13, 2016

CTMH Swan Lake Papers - with yet another kitty!

I am still LOVING the Swan Lake paper pack. It's funny, but I love everything in this pack except the paper with swans on it. Go figure. I'm glad CTMH makes a variety of types in each paper pack. The pile of hearts in the bowl was made with the Charming Cascades and a couple of pieces of post-it notes for masking. Poppy red ink.

The sentiment shows up better in real life - it says "I hope you're in every one of my nine lives". Cute!

Sunday, December 11, 2016

More Swan Lake with Kitties

I wasn't sure what to do with these kitties so I attempted calico!  I love the sentiment (Simon Says Stamps) Happy Purr-thday.  Purr-fect!  

Friday, December 9, 2016

Swan Lake paper pack - continued

While I was still in the mood to play with these papers, I finally got ink on a Simon Says stamp set that I got simply because of this kitty image!  This looks like my Mr. Bilbo Baggins!  I used this sentiment because of who the card is being sent to - not because "baby cakes" ever hisses at anyone!  I colored the kitty with my Derwent Inktense pencils.  (oh, and the kitty and his cat bed are two separate images so I did a wee bit of masking.) 

Wednesday, December 7, 2016

True Love and Swan Lake

This is a special stamp set from Close to My Heart that helps raise funds for Operation Smile (D1711 - $17.95). It's on the back cover of the current Annual Inspirations book.  Unfortunately, everyone I know has not realized that the images in this set are so adorable because the size  is shown at 50% of what the real stamp sizes are.  I copied the card example, changing the color palette and paper to the "Swan Lake" pack.  I like mine better - but that's because these are more in my favorite color season.  

I think that CTMH probably used real stitching on their card - but I just used the journaling pen and drew in stitch lines.  I put the hearts down with just a strip of adhesive in the center and pulled up the sides so it would look like they were loose - and just stitched.  I paper pieced the shirt on the child (it stamps with a bold stripe) and was really, really happy with how the flower placement turned out.  Very fun!

Wednesday, November 30, 2016

Techniques for Open Stamping on Dec. 4th

For our Open Stamping at my house (Nov/Dec combined) we will learn a "new" technique and an alternate method.  We'll be using Perfectly Pine (A1191) from the Holiday Expressions mini-catalog, and a retired Easter stamp (Peace be with you).  I used New England Ivy (retired) and Chocolate colors on Whisper gray cardstock.  The card base is Glacier cardstock and the front 4 x 5 1/4" piece is Twilight (retired) cardstock.  

The "snow" was created with a "snow" stencil and white embossing paste.  This is a very cool, very easy technique!  The alternate is to stamp the snow with the border stamp set Charming Cascades and one of the more opaque pigment ink pads (White Daisy, or Colonial White). 

The holidays are upon us - and I'm preparing for this Sunday's fun while also waiting (not very patiently) for surgery on December 13th.  I hope to not be "out of the saddle" for long, but rather, free from pain and finally able to spend time doing what I love.  

If you are interested in the Perfectly Pine set (only $6.95) you'll need to order it by the end of the year as that catalog goes away soon.  

Namaste.

Thursday, November 10, 2016

House by the forest

This card was inspired by a Pinterest card that used different stamps.  The layout is very much the same but the other artists card was to celebrate a new home and I made mine a Christmas card.  I used all CTMH stamps, paper and inks.  

The house was from a set of winter country scenes - I cut away (*gasp*) two trees from either side of the house because I wanted the big trees to be more in the background.  I colored the house with watercolor pencils and gave the snow a little dab of glimmer ink (like wink of stella).  I was at a weekend retreat with my friends when I snapped this photo - I went into "production" mode until my pencils got too dull and no-one had a pencil sharpener!  Fun times.  I had other things to work on - and we had a blast away from routine chores and distractions.  I love getting away for a few days to just be with my dear friends!  

Monday, November 7, 2016

Shine Bright and a Flop Card

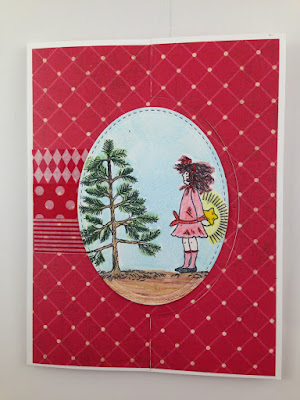
Well, I bought a "flop card" die from My Favorite Things - but I had to watch the You Tube video three times to understand it!  When I finally did "get it", I realized that my card was very "simply" decorated before the cut/score lines were added.  On the inside, I simply flipped over the pattern paper that I had added to the front of the card and cut a little edge to create some pattern.  The lonely "Rejoice" in the upper corner can actually be seen as you begin to flop the card open.  

All stamps and papers were Close To My Heart.  The inside sentiment on the last photo is in the current Holiday Expressions book - it is one of their awesome "A" size stamps ($6.95) and I there are 4 ways to add stars in the package also.  

There is a way to use the flop card die cut to make an easel card but the oval would be horizontal (so this image would not fit).  I think I'll try that next!  

Tuesday, November 1, 2016

Gratitude

This is my first "digital stamp" image.  I was so smitten with the beautiful work that Barbara Walker did here that I wrote to her asking how on earth do you use digital stamps?!  You might notice that our cards look a lot alike!  I wasn't trying to case her card (although that is always a good idea!) - I just wanted to get the bittersweet wreath on the front with a sentiment and this is about all that worked for me!  LOL

I am getting old.  It is difficult to color the tiny dots - I had to enlist the help of my full spectrum desk lamp (haven't used it in years!) and I had to take breaks.  But, the overall effect seems to fit the season and the sentiment is sweet so I'll be making a few of these. Happy November!

Wednesday, October 26, 2016

Christmas Tags

I had to get going on some things for the Open Stamping at my house this coming Sunday!  I thought maybe my friends would enjoy making a couple of tags!  What you can't see from the photo is that the snowflakes are white glitter paper (new from Close to My Heart) and they are SO pretty!  They were cut using the Big Shot with the smaller of the two snowflake thin cute (see the post below for the larger one).  The green tag, I did a background stamp of snowflakes in clear Versa Mark on the kraft paper.  I'm not sure it adds anything, what do you think?  

I've missed my crafting friends so much and am really looking forward to this weekend!  

Monday, October 24, 2016

CTMH Snowflake Thin Cuts


The Holiday catalog included some thin cuts of snowflakes!  There are two in the set - this is the larger of the two.  Just playing around, I tried using some white felt scraps - I liked it but it seemed so plain!  So I used my StarDust Stickles to add some sparkle.  My plan for Open Stamping this weekend is to cut the snowflakes from CTMH white glitter cardstock!  

Saturday, October 22, 2016

A CASE from a very talented lady!

I saw a post by Karen Pederson with a card much like this one that had me running to my storage looking for a pumpkin!  I figured I could use any old sentiment - the pumpkin was the critical part!  I was up in MN at the time, and would you believe that I did NOT have a single pumpkin stamp in that studio?!  My Goodness!  And I have about 400,000,000 of them in the Mesa studio!  We'll have to even that out a little bit!

So, I got the September Close to My Heart stamp of the month - despite telling myself that I didn't need it.  I tried to copy Karen's card, but there are several differences; I stamped, and water colored the pumpkin (I think she used ShinHan markers), I used dew drops (anyone remember those??) and I used waxed flax for the twine element, in a golden, pumpkin-ish color.  I am thankful for her inspiration and really like this one, too.

Friday, October 14, 2016

A card and a NEW LIGHT BOX!


I was inspired to make this card by something I saw on Pinterest.  I changed several things, and the card was not watermarked, so I don't know who to give credit to.  I love the clean-and-simple look of it!

I've been promising myself that I need a light box to photograph things.  I won't go into heavy explanations; you can easily go to YouTube and watch one of several great videos telling you how easily and cheaply you can make your own!  The only addition I will be making is to put a third clip on lamp to illuminate the top of the box.  I'll start out with a 3rd 60 Watt LED light bulb (they stay cooler - so I won't burn myself!) and if that doesn't seem like enough then I'll up the watts to 100


It's good to be home in Arizona, but I must confess that my back is absolutely killing me and I'm not able to get much accomplished between needing to lie on the floor, take naps, etc. etc. Such a bummer to be here with all the time in the world and not feel good enough to get things done. Well, at least I finally got my light box done! ;-)

Thursday, October 6, 2016

Get Well Soon

Everyone needs to take a break now and then from chores and be creative!  I had held out three stamp sets from my packing to make these cards.  I had intended to make a big-ole-pile of them but time pulled me up short at two.  The flower/twigs are from Springtime wishes (with thin cuts) all retired.  The doodled circle is retired. The Get Well wishes is from a Waltzingmouse stamps set.  The ribbons and design papers are from my stash of retired stuff.  So you might say all of this is retired - maybe even the pearls!  Gasp!

I'll be traveling for a couple of days - and then trying to "set up house" again so it will be some time next week before I post again.  I will still be visiting your blogs - so PLEASE show me some inspiration!  Hugs!

Friday, September 30, 2016

sympathy

I was cleaning and organizing and came across a negative image stamp that I haven't used in years and years!  This didn't really start out as I had it in my head - I was going to make a small tag - but with a very pale yellow-white flower.  But the flowers simply didn't show up!  As I added more color, they began to appear.  The process was to stamp the paper with the music, heat dry, then stamp the negative stamp over the music with clear embossing powder, let cool.  I started off trying to put a dark green watercolor pencil on the stems, and they got rather lost as the flowers got darker.  

So, what do you do with such a dark image? Rather than throw it away, I decided to go "elegant" and used the black glossy over matte pattern paper (CTMH), a ribbon from my stash, the sentiment is from a CTMH stamp set (retired, I believe).  I am getting to the age when I use a LOT of sympathy cards - so now I have one for my stash. 

Tuesday, September 27, 2016

Found treasure

Cleaning closets the other day in Steve's house and I came across three embroidered flowers.  I asked - he didn't know anything about them, so I decided to make quick use of them on a trio of cards!  


The blush design paper and zip strip are from Charlotte papers (retired) and the black design was from another retired CTMH paper pack (can't remember the name!).  I had some die-cut felt leaves, and rose-gold sequins.  The Thinking of You and the Happy Birthday are CTMH stamps.  The You Remind me of the Person I'd Like to Become is a stamp from the set "Carpe Diem" made by Verve.  I love that set!  

I am surprised how different they look just by changing up the arrangements on the card - and for the birthday one, making the size square rather than A2.  I used the black design and zip strip along the bottom edges of the insides to carry the theme over.  

Don't you love it when you find something so cool!?!

Sunday, September 25, 2016

Create Kindness


These little M-size stamps from CTMH that are available in the September Create Kindness promotion are just adorable!  I cased a card made by Julie Carriere .  Julie has a lot of great ideas for using the stamps!  This was my first attempt - I simply used a piece of scratch paper at the place where the Raspberry cardstock would be, and stamped part of the "Love" stamp as a border.  I cut one of the 3x3 card bases in half to make a mat, and colored just the focal image. The card base is Slate with a White Daisy piece on the inside for writing. Easy!

Wednesday, September 21, 2016

Playing with smooshing again

I saw a card on Julia Aston's blog here. Julia has inspired me since before I began blogging - in fact, I copied her blog design because I admired it so much.  She's updated hers, and I haven't, but I must tell you, she has provided so much support and guidance and is so gracious about it all!  So, you won't be surprised when you go look at her post and find it is a whole lot prettier than mine.  But you will see the sincerest form of flattery in my imitation.

Buttercup, Blush, and Cashmere inks to smoosh in.  The stamps were done in Cocoa ink.  I also used a Chocolate cardstock for the 5 1/2" square card, and stamped a floral border in Chocolate ink all around the outside.  

Tuesday, September 20, 2016

Halloween

The set is called Monstrous Halloween - and these cute little monsters seem to be all the rage right now!  I've seen them on blankets, pillows, and birthday cards!  LOL  This was another "fancy" fold card.  When pushed flat is is the dimension of an A2 card.  When you open it, it can stand up by itself, which is fun for showing off.  The papers are Jeepers Creepers from CTMH in the brand new Holiday Expressions idea book.  

Monday, September 19, 2016

See ya later, Alligator!

I saw a card like this on Pinterest a long time ago and saved the idea.  While organizing all my stamp sets into Evernote (awesome tool!) I realized that I have a super alligator stamp - so I gave the card a shot!  The only tricky part was the reverse image stamp of the alligator who is going the other way.  What I did was get the stamp good and juicy, then stamped it onto a clean, blank acrylic block and then onto the paper.  You have to be careful to stamp straight down and up - to avoid slipping.  I love that my reverse alligator looks a little different - all fancy with puckers and a darker green color (the color was planned, not the puckers!).  Fun!

Sunday, September 18, 2016

Still playing with watercolors.

I love images where the background was created by simply letting watercolor flow over the paper.  This one turned out neat - it looks like there are white clouds.  The "tree" looks wonky - in real life it has a lot more variation in color.  I inked the stamp three times - once in Saffron, once in Sunset, and once in Poppy.  The tree trunk was done in Saddle and the sentiment (from a Petite Perks reward package) was stamped in Cocoa. 

The background (first mat) is a woodgrain paper in the new Fundamentals package. I thought you might like to see something other than the rose-gold vellum!  The card base is a design paper from last fall, Zoe.  

Saturday, September 17, 2016

Another card with Smooshing technique

I kept playing with the smooshing technique (I wish auto-correct would stop changing that word to smoothing).  This time I used Saffron and Creme Brûlée.  The image is another quick card "Fabulous You" and used watercolor pencils to color the Cardinal and the flowers.  The images were stamped with Cocoa ink.  I popped up the center section (you can see that in the first photo) and I added a wee stripe of the awesome rose-gold striped vellum in the Fundamentals pack.  Wow - I have been really finding ways to use that specific paper!  The right hand side is a piece from Florence papers.  

We had the family all over for an "impromptu" dinner - just grilled hamburgers, hotdogs, homemade mac & cheese, and a million side and snack dishes.  There were 10 of us - a nice small number (small in Steve's opinion).  Dessert was s'mores over the gas fire table.  
Steve made this out of a table that had a center well for icing down beverages (I guess!).  He had a hole opened in the base by a metal shop near home, and got beautiful glass pebbles for the basin.  There is a very small propane tank under the table that is nearly invisible because he painted it black.  It doesn't put off a lot of heat, but it certainly is beautiful to gather around and enjoy making a big mess (ooey-gooey marshmallows, melting chocolate, broken graham crackers - does it get any better than this?!).  The kids of all ages had a blast!

Friday, September 16, 2016

Fabulous You - Quick Card with Florence

I love this retired Close to My Heart stamp set.  It is so easy to create a card that looks like you worked for hours on it - and I've changed up this particular bird several times to look like a different bird!  Today it's a Chickadee.  (teacher, teacher . . .  chick-a-dee, dee, dee) I can hear them calling outside my window.  The chickadee is a fairly small bird but it's amazing how you can hear them yelling all over the neighborhood!  LOL

I used Florence papers, and the focal mat is a Picture My Life card that can be cut apart and used for quick scrapbooking. I added a little diagonal stripe zip-strip for some more interest.  The card base is creme brûlée - a color that has been discontinued but I will continue to show until it's all used up!

I'm still waiting for news on scheduling my surgery. Yikes - it's like waiting for my water to break or something! 

Wednesday, September 14, 2016

Smooshing

It's not at all surprising that I'm late to the smooshing party. I usually don't have all the elements needed to try out a new technique.  This one, I was missing clear acrylic sheets (although in hind-sight I could have used something from the berry or grape tomato baskets).  I used Raspberry, Tangerine and Blossom colors - all brand new from Close to My Heart.  I rubbed the ink pads directly onto the plastic sheet, then spritzed it with a spray of water and then smooshed it over the watercolor paper.  I went back to add and blend in a little bit - but it was basically like this first time out.  

I added a Verve sentiment that I absolutely love on a die cut that might have been Papertray Ink.  The thin silk ribbon in yummy grape color required a piece of design paper from Basic Gray and rather than create a simple mat, I decided to shape both ends of the focal piece.  It was really an easy card to make and fun!  I'm looking forward to having a little more work area (in AZ) so I'm not so squashed when I am smooshing!  LOL